LAB ASSIGNMENT 2 - Installing Windows XP
Materials
Required:
·
Computer
·
Windows XP Professional CD (and product key)
·
Internet access
Activity
1. Boot your
computer with the Windows XP CD. The first part of the installation is
text-based.
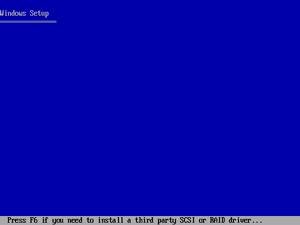
2. The XP installation program inspects your computer’s hardware
configuration and begins loading the Windows XP drivers. The system may prompt
you to press the F6 key if you have SCSI or RAID devices in the computer for
which you have to install a third party driver. Otherwise, the program
automatically detects the storage devices and proceeds with the installation.
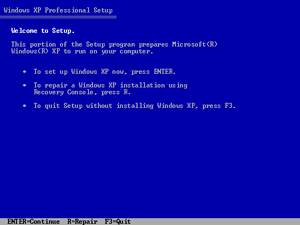
3. After installing the mass storage drivers, the installation program
displays the Welcome to Setup screen, which enables you to repair an existing
Windows XP installation (press R), exit the setup program (press F3), or
proceed with the setup process (press Enter).
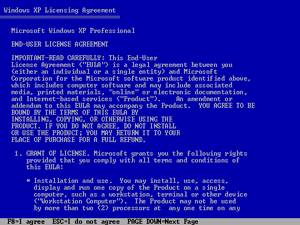
4. The installation program then displays the Windows XP end-user license
agreement. Press the Page Down key to scroll through the entire document, and
then press the F8 key to agree to its terms.
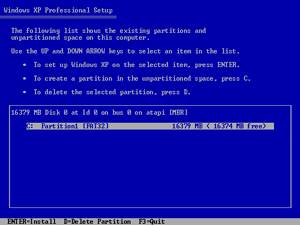
5. In the next part of the installation process, the setup program scans the
hard drives in the system and displays a list of the partitions it finds there
and they file systems they use. Use the arrow keys to select the partition on
which you want to install Windows XP and press Enter to continue. While at the
partition selection screen, if your computer has unpartitioned
space on one of its hard drives, you can also create a new partition for
Windows XP. Do this by highlighting the entry in the list representing the unpartitioned space and pressing the C key.
6. If you select a partition that already has an operating system installed
on it, the setup program informs you that installing a second operating system
(even in another directory) may cause problems. Press the C key to confirm that
you want to use the selected partition, or press the Escape key to return to
the partition list to make another selection.
7. If you don’t want to format the selected partition, and it currently uses
the FAT file system, the setup program gives you the option to convert it from
FAT to NTFS. Use the arrow keys to select Convert the Partition to NTFS and
press the Enter key. This leaves the files and directories stored on the
partition. It’s also possible to convert a partition to NTFS after the
installation process is completed, by running the Convert.exe utility from the
Windows XP command prompt.

8. At this point, the installation program begins copying system files to
the partition you selected, installing them into a system directory called \Windows
by default, unless that directory already exists. If the directory does exist,
the program prompts you to either confirm the use of the default directory name
or supply a different name.
9. When the program finishes copying the system files to their permanent
locations, it prompts you to either reboot the system by pressing the Enter key
or wait for the system to reboot automatically. This concludes the text mode
phase of the installation.

10. When the system first boots into the graphics mode,
the installation program displays a Welcome to the Windows XP Setup Wizard
page. Click the Next button to begin the
installation process, or simply do nothing and the wizard will eventually
proceed by itself.
11. The first thing the wizard does after welcoming you is perform an
extensive auto-detection sequence of the hardware in your computer. This process
can take several minutes and cause your screen to blink.
12. When the hardware detection sequence is finished, the installation
program displays the Regional Settings page.
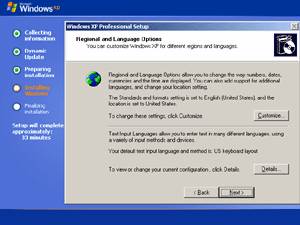
13. In the next part of the Windows XP installation process, the setup
program displays a Personalize Your Software page, on which you specify
information about yourself and your organization.

14. On the Your Product Key page, enter the 25-character product key supplied
with your Windows 2000 Server CD-ROM. Click the Next button to continue.

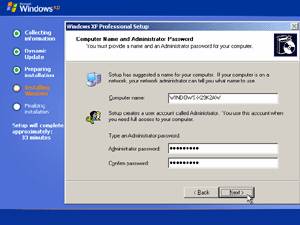
15. Enter a valid NetBIOS name (no more than 15 characters long, and that
contains no spaces or punctuation other than hyphens) in the
Computer Name field on the Computer Name and Administrator Password page. The
name you select must be unique on the network. Enter a password for the
Administrator account that the installation program automatically creates, and
confirm it in the field provided.
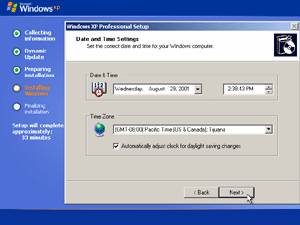
16. Enter the
date and time, which are auto-set based on information in your BIOS, and the
time zone. Change these as appropriate.
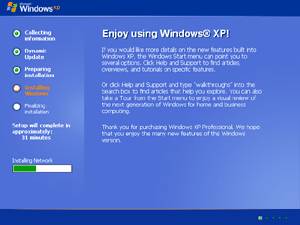
17. Windows
now installs the networking or other hardware components. If you have a
networking card or modem, Setup now installs the default
networking components, which include driver for the
network interface card the program has detected, the client for
Microsoft networks, File and Print Sharing, the Quality of Service (QoS) Packet Scheduler, and the TCP/IP networking protocol.
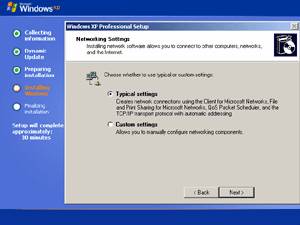
18. You can
choose to keep the default settings (recommended) or enter custom settings. It's
generally best to leave it as-is, unless you have specific needs dictated by
your ISP or network.
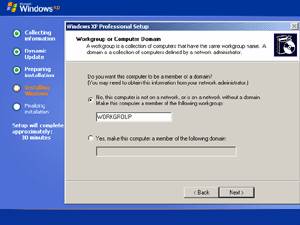
19. In
Windows XP Professional only, you will be able to select a workgroup or domain
name next. The default workgroup name in XP Pro is WORKGROUP. I
recommend changing this to something more descriptive.
20. Setup
will continue to completion without any further need for interaction. Setup
will now copy files, complete installation, install your Start Menu items,
register system components, save settings, remove any temporary files needed by
Setup, and then reboot. You will probably see the "Press any key to boot
from CD" message on reboot. If this happens, do not press a key, and your
new XP install will boot up. You can remove the XP Setup CD now.

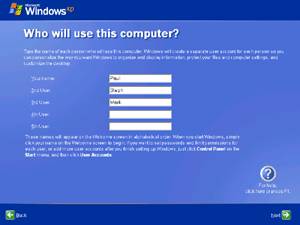
21. Set up
the user names of the people who will be using the PC. You will want at least
one user (for you), since you shouldn't be logging on as Administrator. Each
user created here has administrative privileges and no password. Set up your
users correctly with passwords as soon as possible. You
create up to five users at this time. You can create more later,
or manage users, using the User Accounts tool in Control Panel. Click Finish
when done creating users.
Post-installation
tasks
After Windows
XP is installed, you need to perform a few post-installation tasks:
1.
Immediately run Windows Update to bring sure your system is up-to-date. There are already many updates
available for Windows XP on Windows Update, so you should visit this site right
away (it's found in Help & Support, or you can click the icon in Start
-> All Programs). You may need to reboot after certain updates. Some updates
will require you to install them individually. Keep installing and rebooting
until you've got them all. Windows Update includes hardware driver updates,
critical system updates, security fixes, application compatibility updates, and
other important updates.
2. Test
your hardware devices. Make sure all of your hardware works. Open up Device Manager (Start
-> right-click My Computer -> Properties -> Hardware Tab -> Device
Manager) and make sure all of your hardware was detected and has working
drivers. If any do not--as evidenced by a yellow bang next to the hardware
device's name, right-click and choose Update Driver. This will launch
the Hardware Update Wizard. The first time around, ensure the XP CD-ROM is
still in the drive, and try the option titled Install the software
automatically (Recommended). If this doesn't work, visit the hardware
maker's site and see if there is an updated XP-compatible driver. If this
fails, open up Help and Support and navigate to the Fixing a problem
link under Pick a Help Topic. There, you will find further help about
solving hardware and system device problems.
XP will function with
hardware drivers designed for Windows 2000, but not those for Windows 9x/Me. If
a hardware maker offers a 2000 driver, you should be able to use that, with
rare exceptions. XP will warn you that such drivers are unsigned, but it's
acceptable to use 2000 drivers.
3. Set
up your users.
Microsoft sets up
each user as an Administrator equivalent with no password. This is needs to be
fixed. Launch User Accounts from the Control Panel. Select each account and
supply a password. You can also change the account type and the icon. You can
select from Computer administrator and Limited account types from this tool,
but XP Professional has a more advanced user configuration tool that lets you
select other account types, such as Power User, User, and Replicator. Make sure
all users have a strong password.
4.
Customize the system further. At this point, you might want to configure the wallpaper,
screensaver, and other features, especially if these features weren't carried
over from your previous Windows version for some reason. Windows XP
configuration occurs in a number of places, but some hot-spots include:
·
Display Properties - Right-click an empty area of the background and choose Properties.
·
Performance options - Right-click My Computer, choose Properties, and
navigate to the Advanced tab. Click the Settings button
under Performance.
· Control Panel - configure hardware, networking, installed applications, and other XP features.
5. Defrag your system drive. During installation, your system drive is going to become somewhat fragmented, especially if you didn't format the system drive. Open My Computer, right-click the drive and choose Properties. Navigate to the Tools tab and select Defragment Now.
6. Set up Automatic Updates. Eventually, you will be prompted to set up the Automatic Updates ("Auto Update") feature. It is critical that you do so: Auto Update will download critical security updates automatically, in the background, and then alert you to install them by default. I strongly recommend letting XP set up this feature. Optionally, however, you can choose to be notified before updates are downloaded, or turn off this feature all together.