LAB ASSIGNMENT 11 – Installing and
Exploring Linux
Linux is an operating system that was initially created as a
hobby by a young student, Linus Torvalds,
at the University of Helsinki in Finland. Linus
had an interest in Minix, a small UNIX system, and decided
to develop a system that exceeded the Minix
standards. He began his work in 1991 when he released version 0.02 and worked
steadily until 1994 when version 1.0 of the Linux Kernel was released. The
kernel, at the heart of all Linux systems, is developed and released under the GNU General Public License and
its source code is freely available to everyone. It is this kernel that forms
the base around which a Linux operating system is developed. There are now
literally hundreds of companies and organizations and an equal number of
individuals that have released their own versions of operating systems based on
the Linux kernel. More information on the kernel can be found at our sister
site, LinuxHQ
and at the official Linux Kernel Archives.
The current full-featured version is 2.6 (released December 2003) and
development continues. [http://www.linux.org/info/index.html]
Materials Needed:
- Computer
- Linux
installation CDs
System Requirements
To install and run A Linux-Live CD (Knoppix,
Ubuntu) on your PC, you'll need:
- Pentium-class processor,
preferably 300MHz+
- 64MB RAM
- A spare partition on your
disk, min 3GB
- (of course) a Knoppix CD or Ubuntu
Activity
|
Step 1: Install Linux
|
- Using
the installation CDs, install Linux
(Note: some of you will be asked
to install Linux as a client, while others will install Linux as a server)
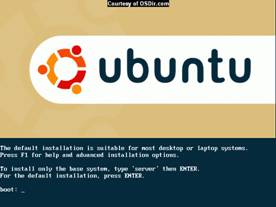
- You
will be asked to enter your language and keyboard layout
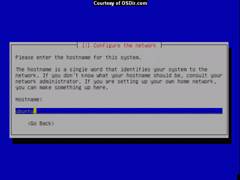
- You
will be asked to enter a hostname
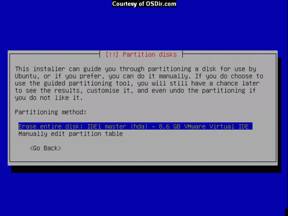
- If
you not installing the Live version, you will then be asked whether you
want to partition and reformat the hard drive
- You
will need to set the timezone
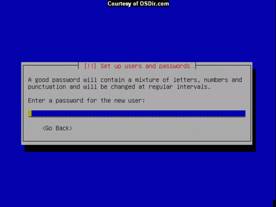
- You
will then be asked for your full name, your username, and password
- Remove
the CD when instructed
- After
the system reboots, you will see it load Linux, following which it will
ask you to set the monitor resolution

- Eventually
it will open the login screen

|
Step 2: Explore Linux (desktop)
|
- Log
into the Linux that you have just installed and explore the system using
the graphical user interface (Note the dropdown menu is on the top level
- The
leftmost menu option is the Applications menu where you can find Accessories,
Games, Graphics, Internet, Office, Sounds & Video, and Systems Tools

- Among
the applications to try are
- Firefox Web Browser
- OpenOffice Word Processor
- Network
Tools (System Tools): devices, ping, netstat,
traceroute, …
- Terminal
(System Tools): opens a terminal window
- The
rightmost menu option is the System menu where you can find the
Administration submenu which includes
- Users
and Groups (add a Desktop user here)
- Networking
(where you set the IP address and other network settings)
|
|
Step 3: Explore Linux (command
line)
|
- Open a terminal
window (we may connect to another computer here)
- Explore the system
using the command line
- Use
man netstat to find information about netstat. [Use the space bar to go to the next page,
CTRL-Z to exit.] How would you display a copy of the routing table?
- Use
the which command to find where netstat is located. Which path is for the program and which
is for the files?
- cd /etc to move to the directory etc
- inspect
the password file (more passwd)
- inspect
the shadow file to see the hashed passwords
- cd /home to move to the directory home
- get
a directory listing of all files and folders (ls)
- get
a directory listing including the hidden files (ls
–a)
- get
a directory listing including all the details (ls
–l)
- find
your folder and move to it
- find
out which folder you are in (pwd)
- find
out who is on the computer ( who or finger)
- exit
the computer (exit)
|
Screens shots are from Open Source and Linux News &
Software (http://shots.osdir.com/slideshows/slideshow.php)